Growing Microgreens Indoors: A Beginner's Guide to Harvest-in-a-Week Greens
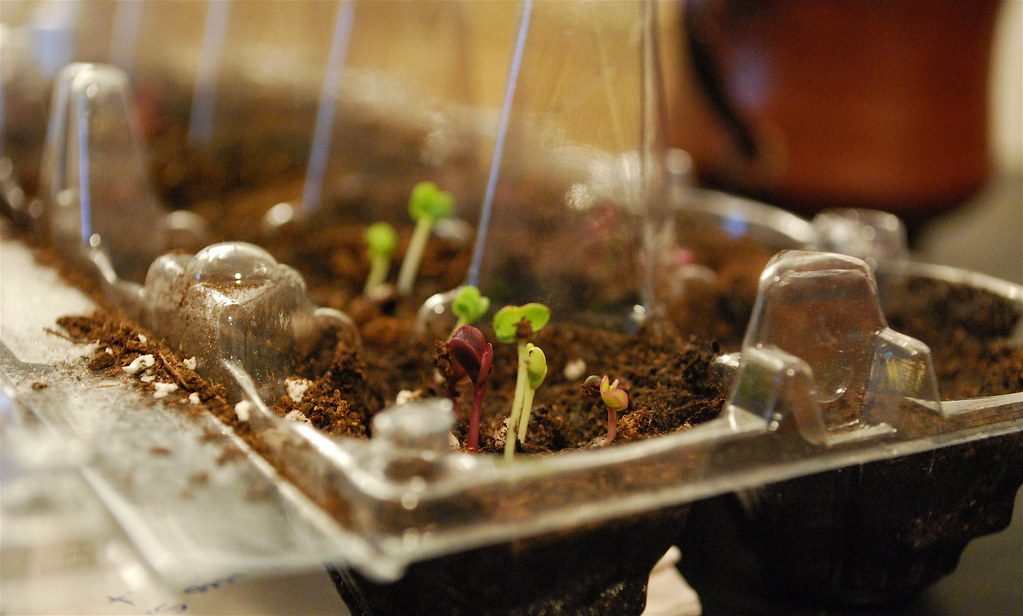
Most indoor growing projects ask for patience — weeks of waiting for a tomato seedling to size up, months for a houseplant to fill out. Microgreens are the exception. From a scattering of seed on a shallow tray to a harvest of dense, nutrient-packed greens takes about a week to ten days, no garden, grow light, or gardening experience required. It’s the closest thing to instant gratification this hobby offers, and it’s one of the easiest ways to grow real food indoors year-round.
What microgreens are
Microgreens sit in a specific window between two other young-plant categories that get confused with them. Sprouts are germinated seeds eaten before any leaves develop at all, grown in water rather than soil, and ready in just a few days. Microgreens are grown in a growing medium and harvested slightly later, right around the point the first true leaves (the second set of leaves, distinct from the initial seed leaves) appear — typically 7 to 21 days depending on the variety. Baby greens are the next stage up, grown longer still, closer to a small but recognizable version of the mature plant.
This middle position is part of what makes microgreens appealing: they’re grown in soil or a soil-free medium rather than sitting in water, which most growers find lower-maintenance and less prone to the sliminess sprouts can develop, while still being ready to eat far faster than any other indoor crop.
What you need to get started
The setup is minimal, which is a large part of the appeal:
- A shallow tray with drainage, 1 to 2 inches deep. Microgreens never develop a substantial root system during their short growing period, so there’s no need for a deep container — a repurposed produce clamshell, a shallow food container with a few drainage holes poked in the bottom, or a purpose-made microgreen tray all work equally well.
- A growing medium. Ordinary seed-starting mix works fine. Coconut coir is a popular choice among more frequent growers since it’s sterile, holds moisture evenly, and makes it easy to see when the surface has dried out and needs water.
- Seeds specifically intended for microgreens or sprouting, rather than seed packets intended for full-size garden growing. Microgreen-specific seed is sold at a density appropriate for the dense sowing this method requires and is typically untreated, which matters since the greens are eaten so soon after germination.
- A spray bottle, for gentle watering during the earliest days before bottom-watering becomes practical.
- A bright window. Direct or strong indirect light for at least a few hours a day is enough for most varieties, given how briefly they’re grown. A basic LED grow light is a worthwhile but optional upgrade for anyone without a good south- or west-facing window.
The growing process, start to finish
- Fill the tray with about an inch of growing medium, leveled but not compacted.
- Sow seeds densely — much more thickly than you would for a full-size garden planting, since microgreens are harvested as a mass of young seedlings rather than grown out as individual plants. Aim for seeds sitting close together without heavily overlapping, following the density guidance on microgreen-specific seed packaging where available.
- Press seeds gently into the surface without burying them deeply — most microgreen seeds need only light soil contact, not real depth.
- Mist thoroughly with the spray bottle and cover loosely (a second tray, a humidity dome, or even a damp paper towel) for the first 2 to 4 days to maintain consistent moisture and encourage even germination.
- Remove the cover once germination is visible, moving the tray to bright light and switching to bottom-watering going forward.
- Water by bottom-soaking — setting the tray briefly in a shallow reservoir of water and letting the growing medium wick moisture upward — once or twice daily as the shallow medium dries out quickly.
- Harvest with clean scissors once the first true leaves have developed, snipping stems just above the soil line.
Easy varieties for a first attempt
Radish and broccoli microgreens are the most commonly recommended starting point — both germinate quickly and reliably, tolerate minor care mistakes reasonably well, and have a distinctive, pleasant flavor (radish sharply peppery, broccoli mild and slightly sweet) that makes the effort obviously worthwhile on the first try. Sunflower and pea shoot microgreens are excellent choices for a slightly more substantial second attempt — both benefit from a brief pre-soak (several hours to overnight) before sowing to speed germination, and both produce a satisfyingly crunchy, larger-format green than the smaller radish and broccoli varieties.
Beets, kale, arugula, and basil all grow well as microgreens too, though basil in particular can be somewhat slower and slightly fussier about consistent moisture than the faster, more forgiving varieties above.
Why growers reach for microgreens specifically
Beyond the speed, microgreens solve a few real problems that make them appealing beyond novelty. They’re an extremely low-cost, low-space way to grow real food indoors through winter, when an outdoor garden isn’t an option and growing herbs indoors only covers part of the kitchen-fresh-greens need. A single small tray costs pennies in seed and produces a useful harvest — enough to top several salads, sandwiches, or bowls — within about a week, which makes the whole cycle easy to keep repeating on a rolling basis rather than treating it as a one-off project.
They’re also a good option for anyone short on gardening space or confidence — a windowsill tray takes up a fraction of the space container gardening for vegetables requires, and the fast turnaround means mistakes are cheap and quickly correctable rather than a season-long setback.
Troubleshooting mold and uneven growth
Mold is the most common microgreen problem, and it’s almost always traceable to one of three causes: seeds sown too thickly and packed too densely for adequate airflow between seedlings, overhead watering that leaves standing moisture pooled on leaves and soil surface, or a growing space with poor air circulation. Thinning the sowing density on the next batch, switching fully to bottom-watering, and running a small fan nearby for a few hours a day all address this directly — a fan in particular makes a bigger difference than most new growers expect.
Leggy, pale growth — thin, stretched stems reaching dramatically toward a light source — indicates insufficient light, the same underlying issue that causes leggy seedlings in any indoor seed-starting setup. Moving the tray to a brighter window or adding supplemental light for a longer part of the day usually corrects it within the next batch.
Uneven germination, with some seeds sprouting well ahead of others, is usually a sowing or moisture consistency issue rather than a seed quality problem — make sure the growing medium is evenly moist across the whole tray surface before covering, and press seeds into consistent, shallow contact with the soil rather than leaving some seeds sitting loose on top where they dry out faster than their covered neighbors.
Soil versus soil-free growing mediums
Standard seed-starting mix or coconut coir is the most common growing medium, but it’s worth knowing that soil-free options exist and work well too, particularly hemp mats, jute mats, or specialized microgreen growing pads sold specifically for this purpose. These mediums hold moisture evenly, add no soil mess to harvest and cleanup, and are reusable or compostable depending on the material — a genuine convenience upgrade for anyone growing microgreens regularly rather than as an occasional project.
The tradeoff is mainly cost and availability: growing mats are a specialty purchase rather than something already sitting in most households the way seed-starting mix or potting soil often is. For a first attempt, ordinary seed-starting mix is the lower-friction choice; switching to a mat-based medium later is an easy upgrade once the basic process feels familiar.
Why seeds matter more than usual here
Because microgreens are harvested and eaten so soon after germination — often within a week or two of the seed going into the tray — seed sourcing matters more than it does for a full-season vegetable garden. Seeds specifically labeled for microgreen or sprouting use are typically untreated (garden seed is sometimes treated with fungicide for outdoor disease resistance, which isn’t a concern for a fast indoor crop but also isn’t something anyone wants concentrated in a food harvested at the seedling stage). Buying seed from a supplier that specifically sells microgreen or sprouting seed, rather than repurposing a leftover packet of full-size garden seed, is a small step that meaningfully reduces this concern, and these suppliers also tend to sell seed at the higher germination rates and sowing density needed for a dense, even microgreen tray.
A favorable cost and nutrition case
Microgreens carry a reputation as a premium, expensive product at grocery stores and farmers markets, often priced per ounce closer to specialty greens than everyday produce — which makes the at-home cost comparison strikingly favorable. A packet of microgreen seed costing a few dollars produces multiple trays’ worth of harvest, each yielding enough to top several meals, at a fraction of a cent per serving once the minimal growing-medium cost is factored in. Extension research has also found some microgreen varieties contain meaningfully higher concentrations of certain vitamins and antioxidants than their mature-plant counterparts, which — combined with the negligible cost and week-long turnaround — makes microgreens one of the more compelling arguments for growing at least a small amount of your own food indoors, even for someone with no interest in a full vegetable garden.
Keeping a rolling harvest going
Because each tray takes only a week or two from sowing to harvest, many regular microgreen growers keep a simple rotation going — starting a new tray every few days so a fresh batch is always a day or two from ready, rather than growing one tray, harvesting it, and starting the next cycle from scratch. A couple of small trays in steady rotation on a single windowsill can realistically keep a household in fresh microgreens continuously through the entire winter, at a negligible cost compared to buying the equivalent from a grocery store, where microgreens are typically sold as a premium product despite costing almost nothing to grow at home.
Using and storing the harvest
Microgreens are best treated as a fresh, use-soon ingredient rather than a stockpiled one — they wilt noticeably faster than mature lettuce or spinach once cut, since the delicate young tissue simply doesn’t hold up the same way. Harvesting only what’s needed for the next meal or two, rather than cutting an entire tray at once, keeps the remaining unharvested greens fresher on the tray (where they’re still alive and growing) than they’d stay in a refrigerator container.
When a full tray does need to be harvested at once, a paper-towel-lined container in the refrigerator, with the greens kept dry rather than rinsed until just before eating, extends usable freshness to roughly three to five days. Common kitchen uses lean on their concentrated flavor and delicate texture rather than treating them as a bulk salad green: a light scattering over eggs, soups, tacos, or sandwiches; a garnish finishing a plated dish; or a simple addition folded into a larger salad of more substantial lettuce for a flavor and nutrition boost rather than as the entire base.
Frequently asked questions
What are microgreens exactly?
Microgreens are vegetable and herb seedlings harvested young, right after the first set of true leaves appears, typically 1 to 3 weeks after sowing depending on the variety. They're distinct from sprouts, which are harvested even earlier without leaves developing at all, and from baby greens, which are grown longer before harvest.
What's the easiest microgreen to start with?
Radish and broccoli are widely considered the most reliable and forgiving varieties for a first attempt, germinating quickly and reliably with minimal fuss. Sunflower and pea shoots are also excellent beginner choices, though they take a bit longer and benefit from a brief soak before sowing.
Do I need grow lights to grow microgreens indoors?
Not necessarily — a bright, sunny windowsill provides enough light for most microgreens to grow well, since they're harvested so young that they don't need the sustained light a mature plant would. A simple LED grow light extends options to less sunny spots and can produce slightly more compact, uniform growth, but it's an upgrade, not a requirement.
What do I grow microgreens in?
Any shallow container with drainage works — a 1 to 2 inch deep tray is ideal, since microgreens don't need deep soil for their short growing period. Purpose-made microgreen trays are convenient, but repurposed produce clamshells, shallow food containers with drainage holes poked in, or seed-starting trays all work equally well.
How often do microgreens need watering?
Bottom-watering — setting the tray in a shallow reservoir of water and letting the growing medium absorb moisture upward — is the preferred method, since overhead watering can knock over the delicate stems and encourage mold in the dense planting. Most microgreens need watering once or twice a day, since the shallow growing medium dries out quickly.
Why did my microgreens get moldy?
Mold usually results from overcrowded seeding, poor airflow, or overhead watering that leaves standing moisture on the leaves and growing medium surface. Sowing seeds at the recommended density rather than as thick as possible, providing some airflow with a small fan, and bottom-watering instead of overhead watering are the most effective fixes.
How do I harvest microgreens?
Use clean, sharp scissors to snip the stems just above the soil line once the first true leaves have developed, typically leaving a small amount of stem behind. Harvest just before use for the best flavor and texture, since microgreens wilt quickly once cut and don't store well for more than a few days even refrigerated.